Okta Using Token2 Classic Tokens with Okta Custom OTP Method | Complete Setup Guide
Learn how to configure Okta Using Token2 Classic Tokens with Okta Custom OTP Method for secure hardware token-based multi-factor authentication. Follow this step-by-step guide to enable Custom OTP, configure authenticators, enroll users through the Factors API, and strengthen enterprise identity security.
Original Source: https://www.token2.com/site/page/using-token2-classic-tokens-with-okta-custom-otp-method-
Requirements for Okta Using Token2 Classic Tokens with Okta Custom OTP Method
- Access to the Okta Admin Dashboard.
- A Token2 Classic hardware token.
- A seed file requested from us.

Okta Using Token2 Classic Tokens with Okta Custom OTP Method provides a secure, scalable, and cost-effective multi-factor authentication (MFA) solution for organizations worldwide. Okta is a leading cloud-based Identity and Access Management (IAM) platform that enables secure Single Sign-On (SSO), Multi-Factor Authentication (MFA), Adaptive Authentication, User Lifecycle Management, and API Access Management for cloud, on-premises, and hybrid environments. By integrating Token2 Classic Tokens with the Okta Custom TOTP (Time-Based One-Time Password) Method, organizations can strengthen account security using hardware OTP tokens that generate unique verification codes without requiring internet connectivity or mobile devices.
With the Okta Using Token2 Classic Tokens with Okta Custom OTP Method, users simply select the Custom TOTP factor during login and enter the time-based one-time password generated by their Token2 Classic hardware token to securely access Okta and all Okta-protected applications and resources. This hardware-based authentication approach helps organizations reduce phishing risks, improve identity protection, and meet regulatory compliance requirements while delivering a reliable authentication experience for employees, contractors, administrators, and remote users.
Important: User enrollment must be performed by administrators through the Okta Factors API, as self-service enrollment for the Custom TOTP factor is not supported. In addition, each user can be enrolled in only one Custom OTP authentication method at any given time.
How to Enable Okta Using Token2 Classic Tokens with Okta Custom OTP Method
Enable the 2FA Method – Custom OTP
1. In the Admin Console, go to Security → Authenticators.
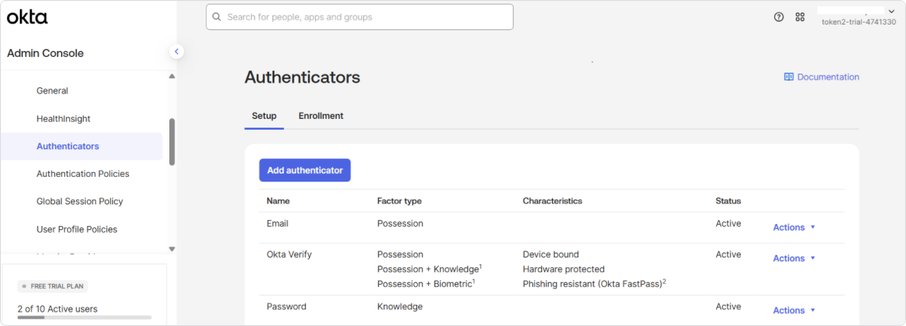
Click “Add authenticator” – Custom OTP for Okta Using Token2 Classic Tokens with Okta Custom OTP Method.
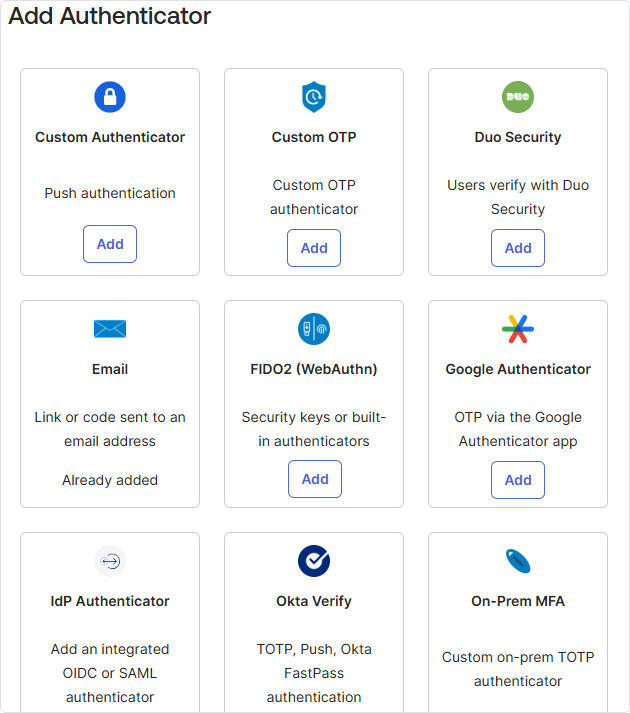
- Click “Add” next to the “Custom OTP” method. Custom One-Time Password (OTP) allows admins to enroll users in a custom OTP authenticator by importing a seed into Okta and authenticating users with the imported hardware token.
- Depending on the token algorithm you plan to use—SHA-1 or SHA-256—create the appropriate authenticator profile. In this guide, we use SHA-1, but SHA-256 is also supported.
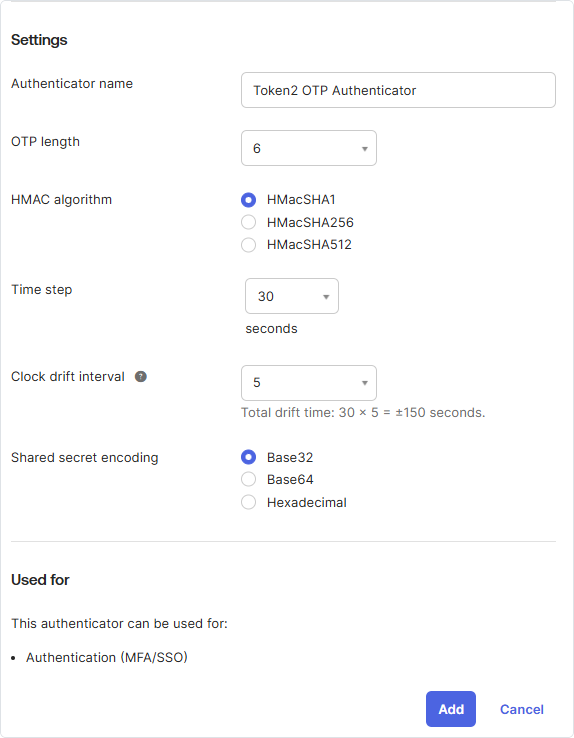
- OTP length: 6
- HMAC Algorithm – select the algorithm that matches your implementation.
- Time step – see Clock drift interval.
- Clock drift interval – this setting defines the tolerance for differences between the token’s clock and the server’s clock.
For example: if you select a time step of 15 seconds and a drift interval of 3, Okta accepts passcodes 15 × 3 = 45 seconds before or after the user enters their passcode. - Shared secret encoding: base32
- Enter the values as shown in the screenshot and click “Add” to save the configuration.
- To copy the Authenticator ID for enrolling users, click Actions → “Authenticator ID & Info” on the saved authenticator, then click the clipboard icon. You will need this ID when enrolling users through the Okta Factors API.
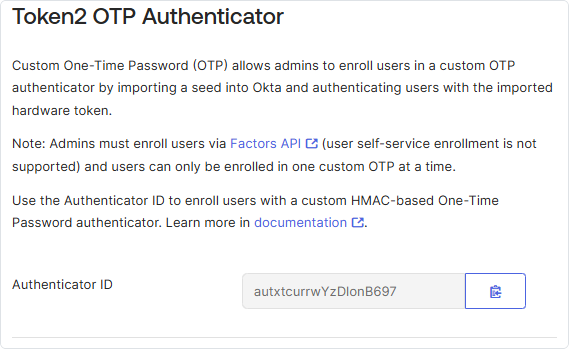
Create token
1. In the Admin Console, go to Security → API.
2. Open the Tokens tab and click “Create token”.
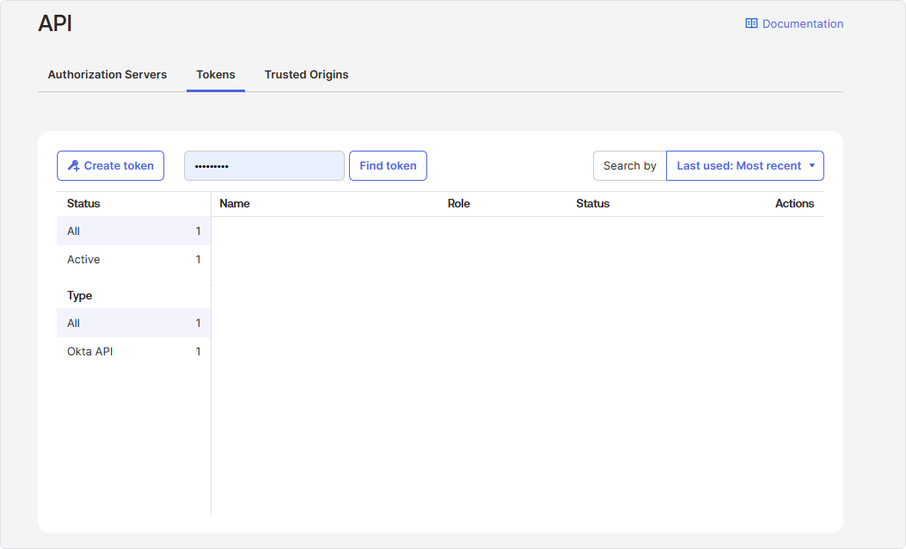
Enter a name and click “Create token”.
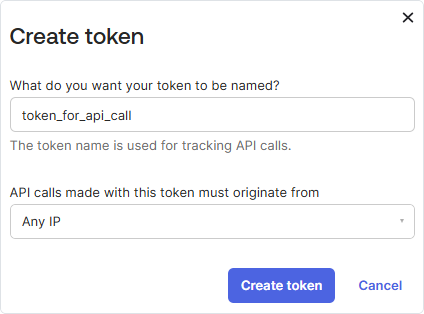
Then click the clipboard icon to copy the token value for the Okta Factors API call.
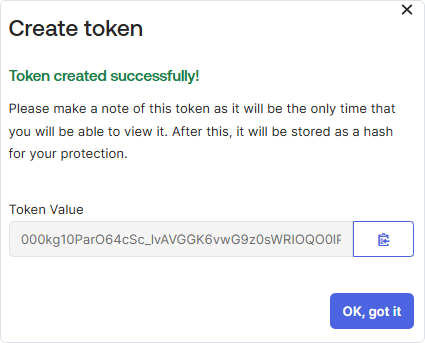
The Factors API provides operations to enroll, manage, and verify factors for Multi-Factor Authentication (MFA). Typically, authentication involves verifying a time-based one-time passcode (OTP). You can manage both administrative and end-user accounts or verify an individual factor at any time. Okta supports several types of factors, but for classic tokens we use token:hotp.

The most commonly used tool for executing Okta API calls is Postman. Okta uses a simple header: Authorization: SSWS
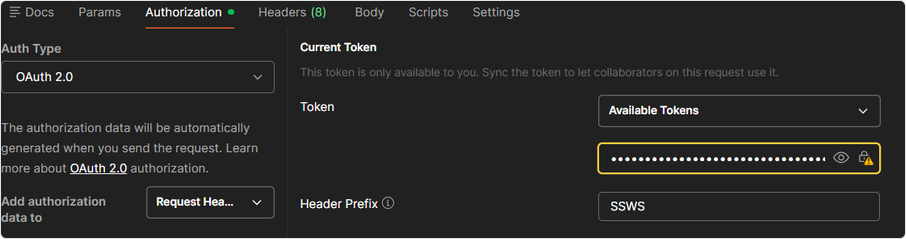
The endpoint used for provisioning this method is a POST request to:
With the following body:
{
  "factorType": "token:hotp",
  "factorProfileId": authenticator_ID,
  "provider": "CUSTOM",
  "profile": {
    "credentialId": "user@domain.com",
    "sharedSecret": "SN3OBMB5L7QXG5XF5WRGLFCH233655AF",
    "timeStep": 30,
    "keyLength": 6,
    "algorithm": "SHA1"
  }
}
Where:
okta_org_URL – your Okta tenant URL
authenticator_ID – ID of the previously created Custom OTP authenticator
user_id – ID of the user for whom MFA is being configured
A successful response should be:
[
    {
        "id": "chfxv715rtW9yBFaq697",
        "factorType": "token:hotp",
        "provider": "CUSTOM",
        "vendorName": "Token2 OTP Authenticator",
        "status": "ACTIVE",
        "created": "2025-11-28T09:01:10.000Z",
        "lastUpdated": "2025-11-28T09:01:10.000Z",
        "_links": {
            "self": {
                "href": "https://trial-6581012.okta.com/api/v1/users/00uxr55bg4x4AmelN697/factors/chfxv715rtW9yBFaq697",
                "hints": {
                    "allow": [
                        "GET",
                        "DELETE"
                    ]
                }
            },
            "verify": {
                "href": "https://trial-6581012.okta.com/api/v1/users/00uxr55bg4x4AmelN697/factors/chfxv715rtW9yBFaq697/verify",
                "hints": {
                    "allow": [
                        "POST"
                    ]
                }
            },
            "user": {
                "href": "https://trial-6581012.okta.com/api/v1/users/00uxr55bg4x4AmelN697",
                "hints": {
                    "allow": [
                        "GET"
                    ]
                }
            }
        }
    }
]
To delete the currently enrolled authenticator profile, send a DELETE request to the following endpoint:
https://okta_org_URL/api/v1/users/user_id/factors/enrolled_profile_id
Use a classic token to log in
After enrolling the authenticator using the Factors API, you can use the classic token as a multi-factor authentication (MFA) method.
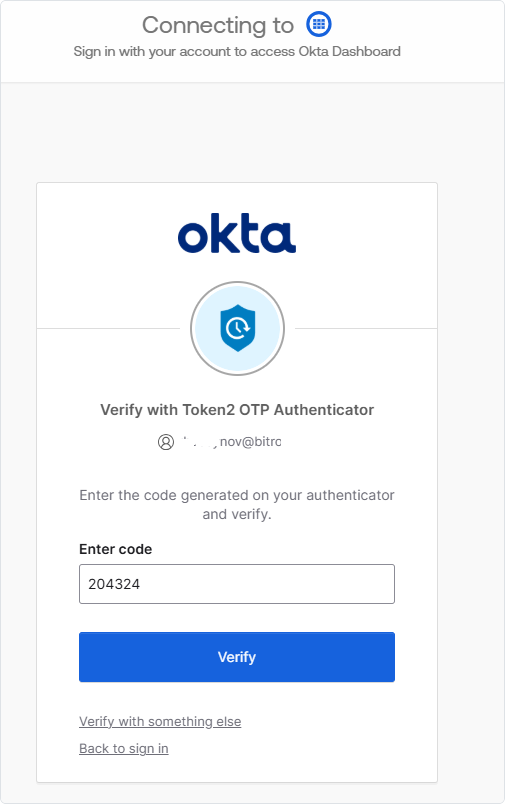
Choose the authenticator used during enrollment and enter the OTP shown on the token display.
Introducing Automatic Token Activation
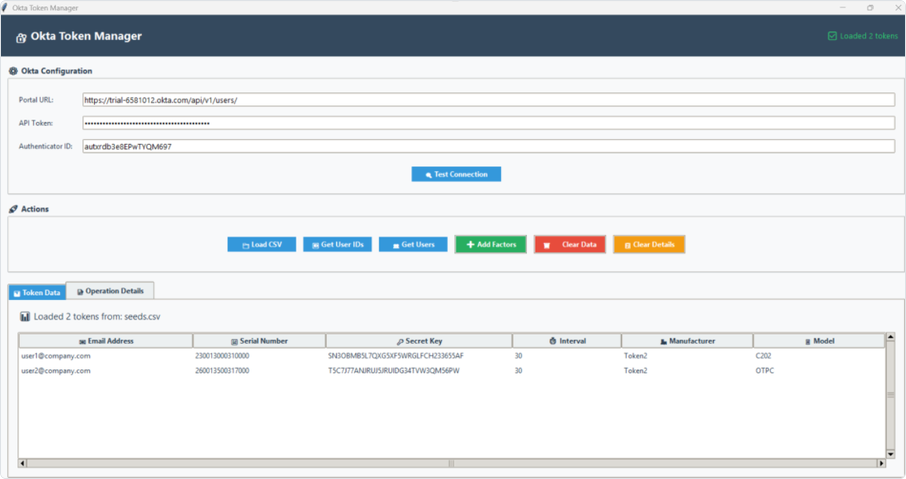
The Okta Token Manager is a GUI-based Python app that supports automatic activation of Token2 Classic OATH tokens during CSV upload. When tokens are assigned to users in the CSV, the app will:
✔ Load a CSV file containing OTP token data
✔ Look up users in Okta by email
✔ Add hardware/software token factors to Okta users
Additionally:
✔ View Okta users
✔ Test API connectivity
✔ Display detailed logs and token details
Okta Token Manager
Automate OATH Token Activation in Okta
Overview
The Okta Token Manager is a Python script with a GUI that simplifies the process of activating and managing OATH tokens in your Okta environment. This tool automates bulk token registration, saving time and reducing manual errors.
Key Features
- Bulk Token Import – Load multiple tokens from CSV files
- Automated User Matching – Automatically find users in Okta
- One-Click Token Activation – Activate tokens for multiple users simultaneously
- Real-time Progress Tracking – Monitor activation progress with detailed logs
- Error Handling – Comprehensive error reporting and troubleshooting
Prerequisites
- Okta administrator account
- API token with appropriate permissions
- OATH tokens available for activation
- CSV file containing token information
Required CSV Format
Your CSV file must contain the following columns:
| Column Name | Description | Example |
|---|---|---|
| upn | User email address | user@company.com |
| serial number | Token serial number | 245252413141 |
| secret key | Token secret key | SN3OBMB5L7QXG5XF5WRGLFCH233655AF |
| timeinterval | Token time interval (usually 30) | 30 |
| manufacturer | Token manufacturer | Token2 |
| model | Token model | C202 |
CSVs for factory-set seeds will be provided by Token2 via the seed request procedure. Choose the format “CSV for Azure MFA…”.
The CSV file sent by Token2 does not contain the UPN for your users, so you must add that information manually. Open the file in a text editor and add the missing information. Make sure you include the header row in your CSV file as shown above. Also, please do not edit the CSV file in Excel—use a text editor (Notepad) instead.
Step-by-Step Guide
Step 1: Configure Okta Connection
- Launch the Okta Token Manager application
- Enter your Okta portal URL (e.g., https://yourcompany.okta.com/api/v1/users/)
- Input your API token (generated from the Okta admin console)
- Enter the Authenticator ID for OATH tokens
- Click “Test Connection” to verify settings
Step 2: Import Token Data
- Click the “Load CSV File” button
- Select your prepared CSV file
- Verify that tokens appear in the table view
- Check that the file information shows the correct token count
Step 3: Match Users in Okta
- Click “Get User IDs from CSV Emails”
- The application will search for each user in Okta
- View results in the details panel
- Note any users not found for follow-up
Step 4: Activate Tokens
- Click “Add Factors to Users”
- The application will register tokens with matched users
- Monitor progress in real time
- Review the summary report upon completion
Step 5: Verify Activation
- Test token functionality with end users
Application Interface
Configuration Section
- Portal URL – Your Okta instance API endpoint
- API Token – Secure token for API access
- Authenticator ID – OATH token authenticator configuration
Action Buttons
- Load CSV File – Import token data
- Get User IDs – Find Okta users by email
- Get Users – Retrieve all users from Okta
- Add Factors – Activate tokens for users
- Clear Data – Reset application data
- Clear Details – Clear operation logs
Data Display
- Token Table – View all imported tokens
- Details Panel – Operation logs and results
- Status Bar – Current operation status
Dependencies
pip install requests
Running the Application
Run it with:
python oktaTokenManager.py
updated: 29/11/2025 18:25
Original Source: https://www.token2.com/site/page/using-token2-classic-tokens-with-okta-custom-otp-method-